Configure Fields
Choose how to set up extraction fields, understand Text / Number / Table / Section types, and refine your parser schema before saving.
After you upload a sample document on the Create Parser page, you configure the exact structure of the data you want to extract. The editor uses a split-screen layout:
- Left panel — Sample document preview (compare fields against your PDF).
- Right panel — Parser details, field setup options, and the schema editor.
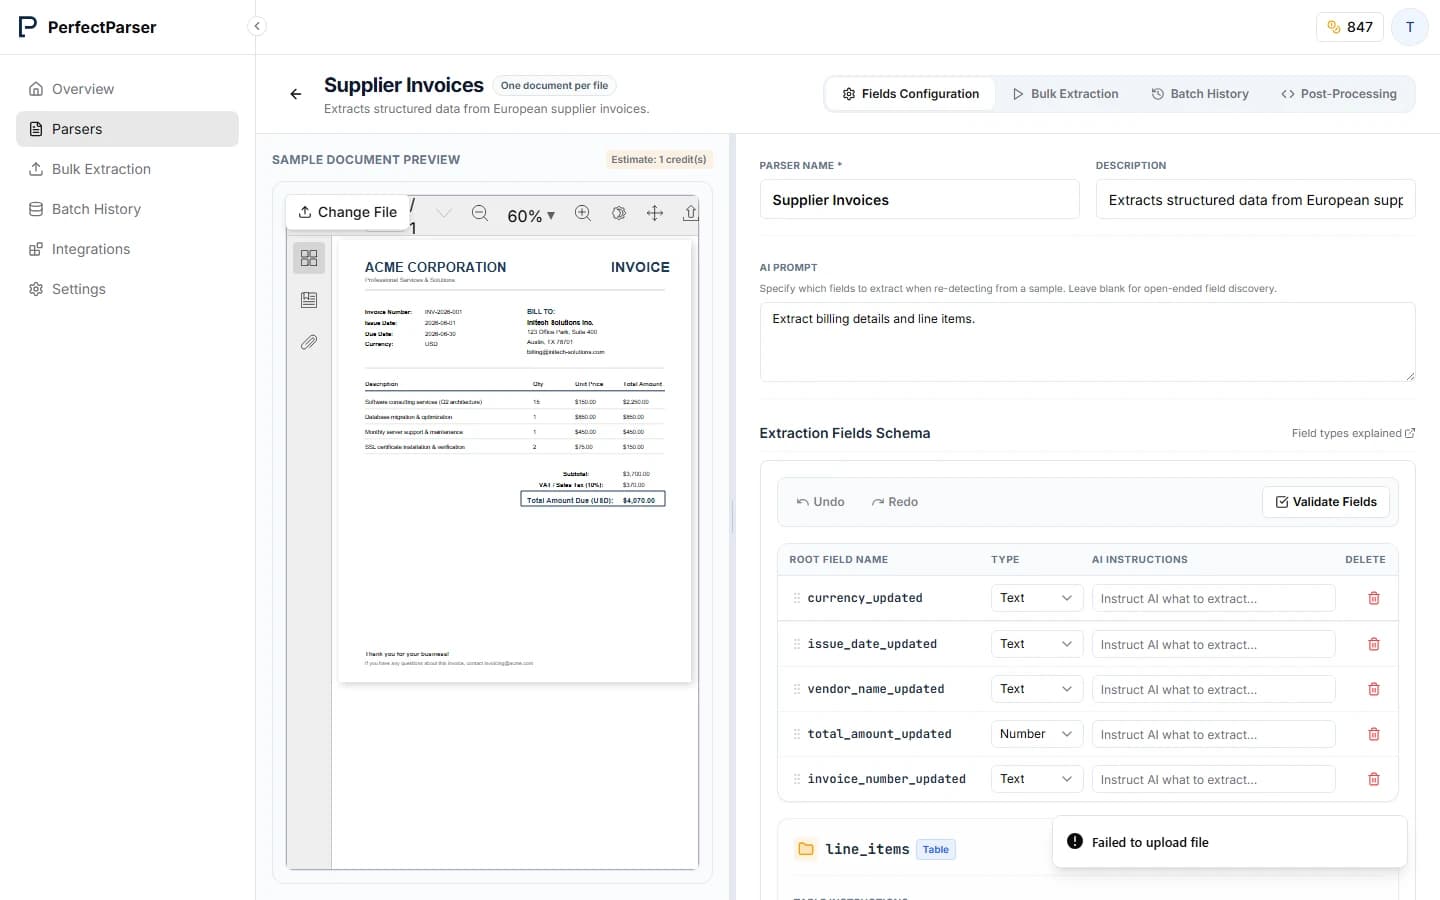
Step 1: Choose how to set up fields
Once your sample has finished uploading, you will see two setup options:
| Option | Best for | Credits at setup |
|---|---|---|
| Detect fields from sample (Recommended) | Let AI read your document and suggest fields tailored to your layout | Uses credits (shown before you click) |
Start from standard {type} fields | Load a pre-configured field list for your document type (requires selecting a document type first) | No credits at setup |
You can also use Start with empty fields if you prefer to build the schema manually from scratch.
Document type (optional) — Selecting Invoice, Receipt, or another type suggests a parser name and unlocks standard fields. It does not restrict AI detection; leave AI Prompt empty to discover all fields from your sample.
Detect fields from sample
- Optionally enter an AI Prompt to focus field detection (e.g. Extract billing details and line items). Leave blank for open-ended field discovery.
- Click Detect fields.
- Review the generated fields in the schema editor below.
See Writing good AI prompts for examples.
Start from standard fields
- Select a Document Type (e.g. Invoice).
- Click Use standard fields on the secondary card.
- Compare the loaded fields with your sample on the left. Add, remove, or edit fields as needed.
You can switch to AI detection later from the banner shown after loading standard fields.
Step 2: Review and refine fields
Go through each field and decide:
- Keep it — Name, type, and AI instructions look correct.
- Rename it — Click the field name to edit (use lowercase letters, numbers, and underscores).
- Change the type — Use the Type dropdown (Text or Number) for single-value fields.
- Remove it — Click the trash icon.
Writing good AI instructions
Each field has an AI Instructions box. Write plain-English guidance so the AI knows what to extract and where to find it.
For Table and Section groups, use the Table instructions or Section instructions box above the child fields to describe what the group represents (e.g. One row per line item).
| ❌ Too vague | ✅ Clear and specific |
|---|---|
| Amount | Total invoice amount due, including VAT, in the invoice currency |
| Date | Invoice issue date in the format shown on the document |
| Name | Full legal name of the vendor (supplier) as printed on the invoice header |
| Ref | Customer purchase order reference number, usually labelled "PO Number" or "Your Ref" |
Field types explained
PerfectParser uses four user-friendly field types. You never need to think about JSON or technical schema terms in the dashboard.
| Type | Use for | Example fields |
|---|---|---|
| Text | Single text values — names, IDs, addresses, dates as shown on the document | invoice_number, vendor_name, due_date |
| Number | Single numeric values — amounts, quantities, counts, rates | total_amount, tax_amount, quantity |
| Table | Repeating rows with the same columns (like a spreadsheet table) | line_items, transactions |
| Section | One nested group of related fields under a single heading | vendor containing name, address, and tax ID together |
Text vs Number
- Choose Text for anything that should stay as printed text (invoice numbers with letters, formatted dates, phone numbers).
- Choose Number for values you want as numeric output — totals, prices, quantities, tax amounts.
Table vs Section
Both appear as grouped cards in the editor with child fields inside. The difference is how many times that group appears in extracted data:
| Table | Section | |
|---|---|---|
| When to use | Data repeats on the document (many rows) | One block of related fields (single group) |
| Example | Invoice line items, bank transactions | A nested vendor block with name + address + tax ID |
| Extracted shape | A list of rows | A single grouped object |
Most invoices use Table for line items. Section is optional — many parsers use flat Text fields at the root instead (e.g. vendor_name, vendor_tax_id).
Step 3: Add fields manually
Use the buttons at the bottom of the schema editor:
- Add Text Field — Single text column (e.g.
po_number). - Add Number Field — Single numeric column (e.g.
total_amount). - Add Table — Repeating rows; define child columns inside (e.g.
description,quantity,unit_price). - Add Section — One nested group; define child fields inside.
Inside a Table or Section, use Add Field to {name} to add child columns.
Step 4: Save your parser
When you are happy with the field list:
- Click Create Parser in the bottom bar.
- You are taken to the parser detail page. Open the Extract tab to run documents and choose How are your files organized? (One document per file vs One document per page).
Field setup happens at parser creation. File organization is configured when you run extractions — see Bulk Extraction.
Writing good AI prompts
Optional AI prompts help focus field detection when you know exactly what you need. Leave the box empty to let AI discover all fields from the sample.
| Document Type | Example prompt |
|---|---|
| Invoices | Extract the vendor details, invoice number, issue date, tax breakdown, and total. Identify the line items table and extract the description, quantity, and unit price. |
| Utility Bills | Extract the account number, billing period start/end dates, total charge, and usage details (like kilowatt-hours or gallons consumed). |
| Retail Receipts | Extract the store name, transaction date and time, payment method, total tax paid, and list of items purchased. |
| Delivery Notes | Extract the sender, recipient, carrier name, tracking number, shipment date, and list of packages with their weights and contents. |